Replacing the low beam headlight bulb
To replace the low beam headlight bulb, it is not necessary to remove the headlight.
The illustrations show replacing the left low beam headlight bulb.
The right low beam headlight bulb is replaced in a similar manner.
Removal:
– Switch off the ignition and all electrical consumers. Remove the key from the ignition switch.
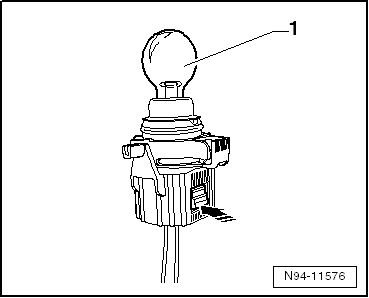
Only for headlight manufacturer Hella:
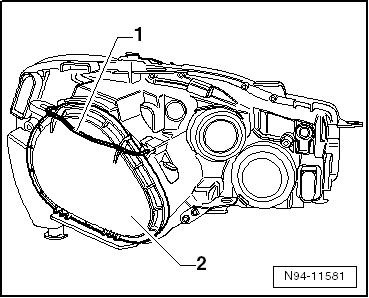
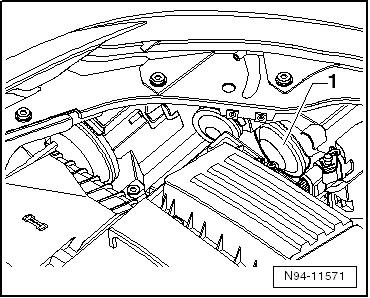
– Remove cover -1-.

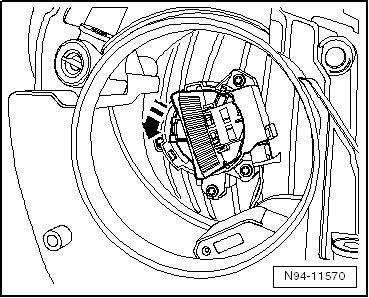
Note
For clarity, the following illustration shows the headlight removed.
It is not necessary to remove the headlight to replace the low beam headlight bulb.
Only for headlamp manufacturer Valeo:
– Pull the clip -1- upwards and remove the cover -2- from the rear of the headlamp.
Continued for all cars:
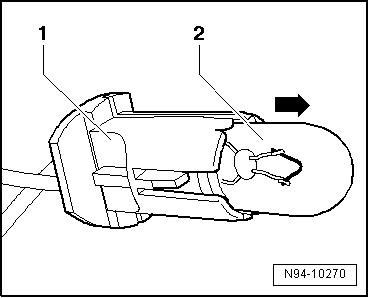
– Remove the low beam headlight bulb -2- in the -direction of the arrow- from the socket -1-.
Remove the low beam headlight bulb -2- in the -direction of the arrow- from the socket -1-.
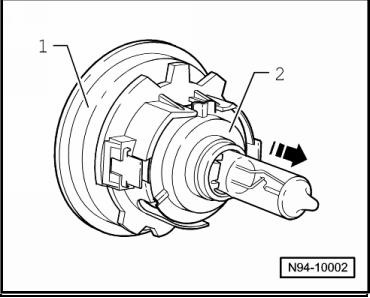
Low beam headlight bulb: 12V, 55W
Installation:
Caution!
When installing the cover, ensure that it is in the correct position. If moisture gets into the headlight, the headlight will be destroyed.
Note:
When installing the lamp, do not touch its glass bulb with your fingers. Fingers leave traces of grease on the surface of the glass bulb, which begins to evaporate when the lamp is turned on, causing the bulb to become cloudy.
– Check the operation of the headlight.
– Check and, if necessary, adjust the headlight: „Inspection service and maintenance“
Replacing the high beam headlight bulb and daytime running light bulb
Note
The left high beam headlight bulb -M30-/right high beam headlight bulb -M32- is a dual-filament bulb and also functions as the left daytime running light bulb -L174-/right daytime running light bulb -L175-.
It is not necessary to remove the headlight to replace the high beam/daytime running light bulb.
The illustrations show replacing the high beam/daytime running light bulb on the left headlight.
Replacing the high beam/daytime running light bulb on the right headlight is carried out in the same way.
Removal:
– Switch off the ignition and all electrical consumers. Remove the key from the ignition switch.
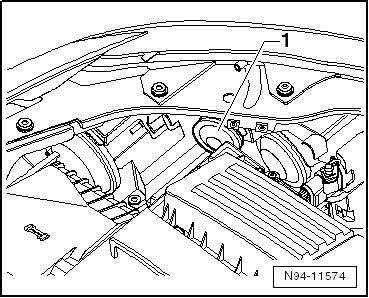
– Remove cover -1-.

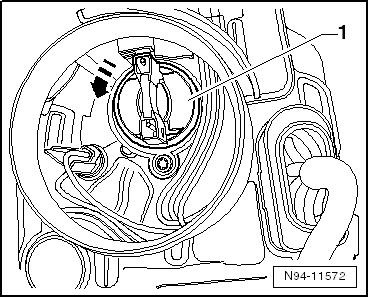
– Turn the bulb holder -1- in the direction of the -arrow- and remove it from the headlight together with the high beam/daytime running light bulb.
Note
The high beam/daytime running light bulb is permanently connected to the socket and cannot be disassembled further.
High beam/daytime running light bulb: 12V, 15/55W
Installation:
Caution!
Ensure that the cover is positioned correctly when installing. If moisture gets into the headlight, the headlight will be destroyed.
Note
When installing the lamp, do not touch its glass bulb with your fingers. Fingers leave traces of grease on the surface of the glass bulb, which begins to evaporate when the lamp is turned on, causing the bulb to become cloudy.
Installation is carried out in the reverse order. In this case, it is necessary to observe the following:
– Check the operation of the headlight.
– Check the headlight settings, adjust if necessary
Replacing the parking light bulb (side light)
Note
It is not necessary to remove the headlight to replace the parking light bulb.
The illustrations show replacing the left parking light bulb.
The right parking light bulb is replaced in a similar manner.
Removal:
– Switch off the ignition and all electrical consumers. Remove the key from the ignition switch.
– Remove cover -1-.
– Taking into account the length of the connected wires, remove the lamp holder -1- with the parking light bulb to the left from the reflector.
– Remove the parking light bulb -2- in the -direction of the arrow- from the socket -1-.
Parking light bulb: 12V, 5W baseless bulb
Installation:
Caution!
When installing the cover, ensure that it is positioned correctly. If moisture gets into the headlight, the headlight will be destroyed.
Note:
When installing the lamp, do not touch its glass bulb with your fingers. Fingers leave traces of grease on the surface of the glass bulb, which begins to evaporate when the lamp is turned on, causing the bulb to become cloudy.
Installation is carried out in the reverse order. In this case, the following must be observed:
– Check the operation of the headlight.
Replacing the front turn signal bulb
Note
It is not necessary to remove the headlight to replace the front turn signal bulb.
The illustrations show replacing the left front turn signal bulb.
The right front turn signal bulb is replaced in the same way.
Removal:
– Switch off the ignition and all electrical consumers. Remove the key from the ignition switch.
– Remove cover -1-.
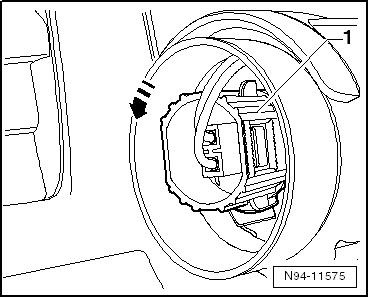
– Turn the bulb holder -1- in the -direction of the arrow- and remove the front turn signal bulb downwards from the headlight.
– Press the release button -arrow- and pull the front turn signal bulb-1- upwards out of the socket.
Note
The front turn signal lamp is permanently connected to the lamp holder and cannot be disassembled further.
Front turn signal lamp: 12V, PSY 24W SV
Installation:
Caution!
When installing the cover, ensure that it is positioned correctly. If moisture gets into the headlight, the headlight will be destroyed.
Note
When installing the lamp, do not touch the glass bulb with your fingers. Fingers leave traces of grease on the surface of the glass bulb, which begins to evaporate when the lamp is turned on, causing the bulb to become cloudy.
Installation is carried out in the reverse order. In this case, it is necessary to observe the following:
Note
To secure it in the reflector, the lamp socket has locking protrusions of different lengths.
Insert the socket together with the front turn signal bulb into the reflector so that the longer locking protrusion is facing up.
– Check the operation of the headlight.
