Important safety instructions
Xenon lamps
If your car is equipped with xenon lamps, then when the engine is started, the light cone of the xenon lamps moves from top to bottom and back. In this case, the light must be turned on before starting the engine.
Xenon lamps are under high voltage. If you touch the electrical contacts of xenon lamps, you can get an electric shock, which can cause serious or even fatal injuries. Therefore, do not remove the covers of xenon lamps.
Do not replace xenon lamps yourself; always contact a specialized workshop that has the appropriate specialists and tools to carry out the required work.
Mercedes-Benz recommends using the services of a Mercedes-Benz service centre for this purpose. In particular, in the case of work related to safety or work on systems that ensure safety, it is essential to contact a specialist workshop with qualified personnel.
Lamps and lights are important elements that ensure safe driving. Therefore, always monitor the serviceability of all lighting devices. Regularly check the adjustment of the headlight angle.
Other lamps
In addition to xenon lamps, there are other lamps that cannot be replaced by yourself. Replace only the lamps listed Details . Have lamps that cannot be replaced by yourself replaced by a specialized workshop with qualified personnel.
Mercedes-Benz recommends using the services of a Mercedes-Benz service centre for this purpose. In particular, in the case of work related to safety or work on systems that ensure safety, it is essential to contact a specialist workshop with qualified personnel.
If you need help replacing lamps, please contact a qualified specialist workshop.
Do not touch the glass bulbs of new lamps with bare hands. Even small dirt can burn and reduce the life of the lamp. Use a clean, lint-free cloth or handle the lamp only by the base.
Use only the correct type of lamp.
If the new lamp does not light, contact a specialized workshop with qualified personnel.
Lamps and lights are important elements that ensure safe driving. Therefore, always monitor the serviceability of all lighting devices. Regularly check the adjustment of the headlight angle.
CAREFULLY
Lamps and lanterns can be very hot. Therefore, wait until they cool down before replacing them. You can burn yourself if you touch them.
Keep lamps out of reach of children. Otherwise, they may, for example, damage the lamps and get injured.
Do not use fallen lamps. The lamp may burst and injure you.
Halogen bulbs are under high pressure and may burst when replaced, especially if they are very hot. Therefore, wear protective glasses and gloves when replacing them.
Overview: Replacing Light Bulbs – Types of Light Bulbs
You can replace the following lamps. The lamp types are indicated in the legend.

Halogen headlight
| 1 | Low beam: H7 55 W |
| 2 | High beam: H7 55 W |
| 3 | Parking/side light: W 5 W |
| 4 | Direction indicator: PY 21 W |
| 5 | Direction indicator: WY 5 W |
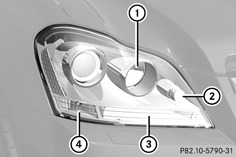
Bi-xenon headlight
| 1 | High beam: H7 55 W |
| 2 | Parking/side light: W 5 W |
| 3 | Direction indicator: PY 21 W |
| 4 | Direction indicator: WY 5 W |
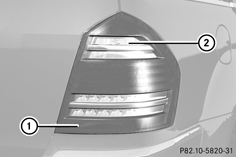
Rear light with LEDs
| 1 | Rear fog light: H 21 W (driver side only) |
| 2 | Reversing light: P 21 W |
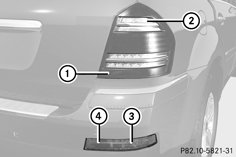
Tail light (spare tire bracket outside)
| 1 | Rear fog light: H 21 W (driver side only) |
| 2 | Reversing light: P 21 W |
| 3 | Direction indicator: PY 21 W |
| 4 | Tail light/parking light/brake light: P 21 W |
icense Plate Light (Spare Tire Bracket Inside)
| 1 | Number plate light: C 5 W |
License plate light (spare tire bracket outside)
| 1 | Number plate light: W 5 W |
Replacing the front lamps
Low beam (halogen headlights)
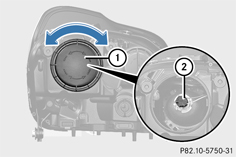
Turn off the lighting system.
Turn the housing cover 1 counterclockwise and remove it.
Turn the cartridge 2 counterclockwise and remove it.
Remove the lamp from the socket 2.
Insert the new bulb into the socket 2.
Insert the cartridge 2 and turn clockwise.
Install the housing cover 1 and turn clockwise.
High beam
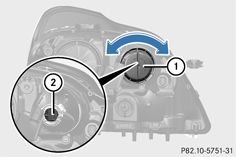
Turn off the lighting system.
Turn the housing cover 1 counterclockwise and remove it.
Turn the cartridge 2 counterclockwise and remove it.
Remove the lamp from the socket 2.
Insert the new bulb into the socket 2.
Insert the cartridge 2 and turn clockwise.
Install the housing cover 1 and turn clockwise.
Parking / parking light
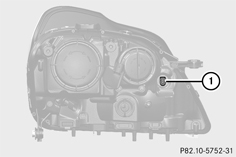
Turn off the lighting system.
Turn the cartridge 1 counterclockwise and remove it.
Remove the lamp from the socket 1.
Insert the new bulb into the socket 1.
Insert the cartridge 1 and turn clockwise.
Direction indicator
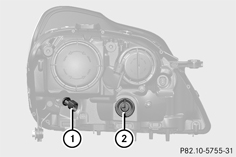
Turn the chuck 1 (WY 5 W) / 2 (PY 21 W) counterclockwise and remove.
Remove the lamp from the socket 1 / 2.
Insert the new bulb into the socket 1 / 2.
Insert the cartridge 1 / 2 and turn clockwise.
Replacing rear lamps
Opening and closing the side trim
Before replacing the rear light bulbs, you must open the side trim in the luggage compartment.
Left side trim
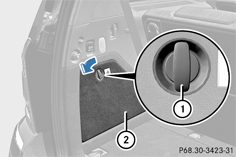
Opening: Turn the release button 1 90 ° in the direction of the arrow and remove the side trim 2.
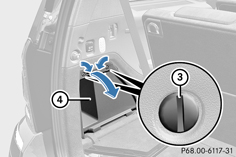
Insert a suitable object, such as a coin, into the slots of the release buttons 3.
3 Turn the release buttons 90° in the direction of the arrow and remove the storage compartment 4 .
Closing: Install the storage compartment 4 and turn the release buttons 3 against the direction of the arrow until the release button slots are vertical.
Install the side trim 2 and turn the release button 1 90 ° counterclockwise.
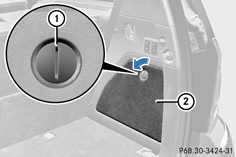
To open: Insert a suitable object, such as a coin, into the slot 1 on the side panel release button 2 .
Turn the release button 1 90 ° in the direction of the arrow and remove the side trim 2.
Closing: Position the side panel 2 and turn the release button 1 90 ° counterclockwise.
Rear light with LEDs

| 1 | Rear fog light |
| 2 | Reversing light |
Turn the corresponding cartridge counterclockwise and remove it.
Remove the lamp from the socket.
Insert the new bulb into the socket.
Install the cartridge and turn clockwise.
Tail light (spare tire bracket outside)
In vehicles with an external spare wheel bracket, the following lamps are located in the bumper:
- Direction indicator
- Tail light/parking light/brake light
- License plate lights
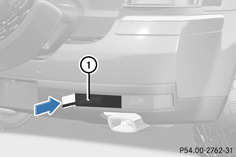
Turn off the lights.
Insert a plastic card into the gap between the bumper and the headlight 1 .
Press the plastic card in the direction of the arrow.
The headlight unit 1 comes out of the locking mechanism.
Remove the headlight unit 1.
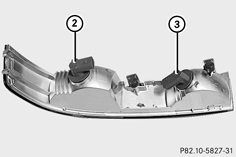
| 2 | Direction indicator |
| 3 | Tail light/parking light/brake light |
Turn the corresponding cartridge counterclockwise and remove it.
Press the bulb lightly into the socket, turn it counterclockwise and remove it.
Insert the new bulb into the socket and turn it clockwise in the holder.
Insert the appropriate cartridge and turn clockwise.
Place the headlight unit on 1 and press firmly.
The headlight unit 1 is fixed.
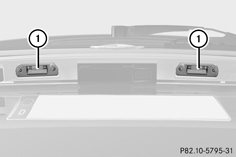
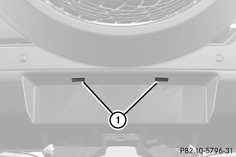
License plate lighting
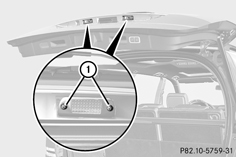
Turn off the lights.
Remove the screws 1.
Remove the license plate light.
Install the license plate light.
Screw in the screws 1.