Renault Trucks T fuses
Truck fuses are designed to protect electrical circuits from overload and usually only blow after a short circuit. Therefore, if a fuse blows, you should always give an authorized workshop the opportunity to determine the cause.
Access to Renault Trucks T fuses
To access the fuses:
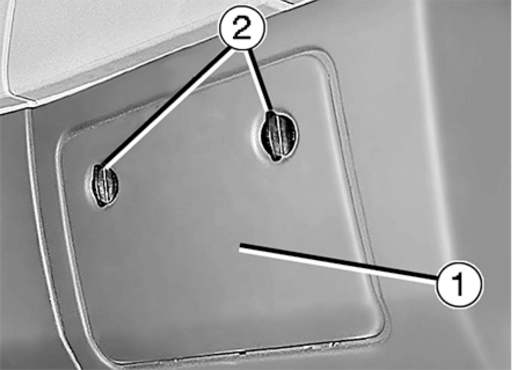
- Turn the two latches (2) ¼ turn.
- Remove the cover (1).
After the operation, install the cover (1) and turn the latches (2) ¼ turn.
Carefully
Before performing any operations on the fuses, make sure the vehicle is turned off.
Replace the fuses using pliers (3).
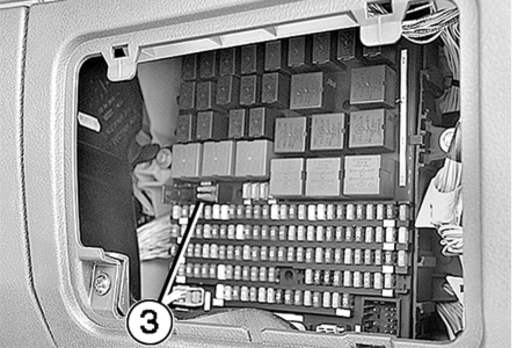
Fuse sizes correspond to their functions. Before replacing, check or have the components and electrical cables checked for the appropriate function.
The fuses listed in the table below as unused may be useful to you.
Caution Only replace the fuse with a new and identical fuse. The role of the fuse is to protect the vehicle from the risk of component damage or the risk of fire.
Always replace the fuse with one of the same rating.
Depending on the configuration of your car
Fuse table on the Renault Trucks T electrical distribution box
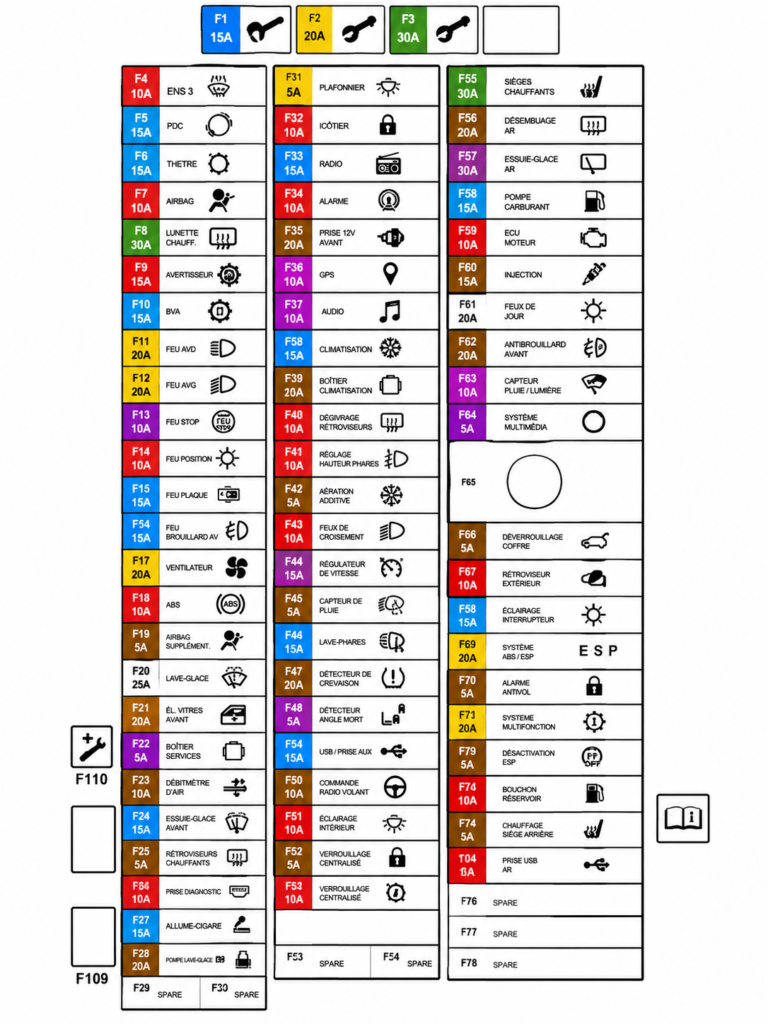
| Appointment | (F) Tags | Current strength |
| Remote data transfer | F01 | 5 |
| Power take-off box | F02 | 3 |
| Daytime running lights (DRL) | F03 | 5 |
| Fog lights | F04 | 15 |
| High beam headlights | F04 | 15 |
| Front window motors | F05 | 20 |
| USB flash drive | F06 | 5 |
| Reverse signals | F07 | 10 |
| Differential lock | F08 | 10 |
| Suspension control unit | F09 | 5 |
| Drive axle control unit | F09 | 5 |
| Air conditioning | F10 | 5 |
| On-board computer | F11 | 10 |
| Radiator (ventilation) | F12 | 20 |
| Adjustable heated mirrors | F13 | 15 |
| Remote data transfer | F14 | 10 |
| On-board computer | ||
| Reverse signals | ||
| Reverse buzzer | ||
| EBS electronic unit | F15 | 3 |
| Electric wiper(s) drive | F16 | 20 |
| Not used | F17 | 20 |
| Rear window electrics (4-door cab) | ||
| Preparing to install additional equipment | F18 | 15 |
| Automatic transmission diagnostic connector | F19 | 10 |
| Headlight washer pump | F20 | 30 |
| CNG junction box, not used on other vehicles | F21 | 10 |
| Electronic engine control unit | F22 | 15 |
| Drive mechanism on a variable geometry turbocharger | F23 | 15 |
| On-board computer | F24 | 10 |
| Car radio | F25 | 15 |
| 12 V socket | ||
| 24V/12V step-down transformer for instrument panel | ||
| Diagnostic connector (OBD) | F26 | 5 |
| Working light | F27 | 10 |
| Car radio | F28 | 3 |
| Accessories | ||
| 12 V socket | ||
| 24V/12V step-down transformer for instrument panel | ||
| Remote data transfer | ||
| High beam headlight, left | F29 | 10 |
| High beam headlight, right | F30 | 10 |
| Pre-cleaning fuel filter heater | F31 | 15 |
| Fuel heater and air filter dryer. | F32 | 20 |
| Trailer ABS/EBS connector | F33 | 10 |
| Trailer connector | F34 | 10 |
| Transmission | F35 | 10 |
| Retarder | F36 | 10 |
| Transponder | F37 | 5 |
| Display | ||
| Centralized air control (auxiliary equipment, maintenance, …) | ||
| Alarms | ||
| Central lock | ||
| Diesel particulate filter regeneration button (Euro-VI) | ||
| Prerequisites for a client on a chassis | F38 | 15 |
| Prerequisites for the customer in the cabin | F39 | 15 |
| Cab tipping | F40 | 3 |
| Bodywork information (parking brake engaged) | ||
| 24V connector on the console panel | F41 | 15 |
| Luke | F42 | 10 |
| Electronic unit of the driving assistance system “DACU” | F43 | 5 |
| Not used | F44 | 10 |
| Not used | F45 | 10 |
| “EGR” solenoid valve | F46 | 15 |
| Lever for manual transmission | ||
| Engine fan | F47 | 10 |
| EBS electronic unit | F48 | 20 |
| Ignition key | F49 | 10 |
| Transponder | ||
| Vehicle electronic control unit “VECU” | ||
| Fog lights | F50 | 5 |
| Fog lights for trailer | F51 | 5 |
| Cigarette lighter | F52 | 15 |
| ADR power supply (alternator and ground switch) | F53 | 3 |
| Not used | F54 | 5 |
| Display | F55 | 5 |
| Central turn signal assembly | F56 | 10 |
| Emergency alarm button | ||
| Chronograph | F57 | 3 |
| Autonomous heater | ||
| Heated seats | F58 | 10 |
| Seat belt warning light | ||
| Preparation for installation of body equipment (engine running) | ||
| Suspension control unit | F59 | 5 |
| Additional high beam headlights | F60 | 10 |
| Right trailer marker lights | F61 | 10 |
| Rear right side lights | F62 | 5 |
| Rear left side lights | F63 | 5 |
| Left trailer marker lights | F64 | 10 |
| Prerequisites for the client | F65 | 15 |
| Presets for body equipment (van lighting, machine control) | F66 | 10 |
| Bodywork equipment settings (left-hand lighting lamps) | F67 | 10 |
| Tachograph | F68 | 3 |
| Electronic cleaning control unit | F69 | 5 |
| Body control unit (BBM) power supply | F70 | 5 |
| Vehicle electronic control unit “VECU” | F71 | 5 |
| Engine preheating | F72 | 10 |
| Tire pressure monitoring | F73 | 5 |
| Drive axle control unit | ||
| Sound signal | F74 | 10 |
| Fog light, right | F75 | 10 |
| Fog light, left | F76 | 10 |
| Not used | F77 | 10 |
| Central door locking | ||
| Trailer ABS/EBS connector / Air conditioning | F78 | 20 |
| Auxiliary heater switch | F79 | 5 |
| Central lock | F80 | 5 |
| Central door locking | F81 | 10 |
| Front parking lights on the right side | F82 | 5 |
| Front parking lights on the left side | F83 | 5 |
| Presets for body equipment (lighting lamps) | F84 | 5 |
| Telephone | F85 | 3 |
| Flashing beacons | F86 | 15 |
| Stop signs | F87 | 7,5 |
| Trailer brake lights | F88 | 7,5 |
| Presets for body equipment (right-hand lights) | F89 | 10 |
| Transmission control unit | F90 | 15 |
| Headlight lighting drive | F91 | 3 |
| Display | F92 | 5 |
| Cab tipping | F93 | 30 |
| Central turn signal assembly | F94 | 30 |
| Autonomous heater | F95 | 20 |
| 24V sockets | F96 | 15 |
| Step-down transformer 24 V/12 V | ||
| Refrigerator | F97 | 10 |
| Tachograph | F98 | 3 |
| Alarms | F99 | 5 |
| On-board computer | F100 | 3 |
| Dashboard lighting dimmer | F101 | 3 |
| Centralized Air Management (APM) | F102 | 7,5 |
| Cabin adjustment / Chronograph | F103 | 10 |
| Cabin lighting | F104 | 10 |
| 24V connector on the console panel | F105 | 15 |
| 24V/12V step-down transformer on console panel | F106 | 10 |
| CB presets | ||
| Autonomous heater | F107 | 15 |
| 24 V socket on the instrument panel | F108 | 15 |
| Hydraulic retarder | F109 | 10 |
Renault Trucks T fuse color
Fuse colors are standardized and indicate their rating. However, always check that the markings on the new fuse match those on the fuse being replaced before use.
| Current strength | Color |
| 1 ampere | Black |
| 2 amps | Gray |
| 3 amps | Violet |
| 4 amps | Pink |
| 5 amps | Light brown |
| 7.5 amps | Brown |
| 10 amps | Red |
| 15 amps | Blue |
| 20 amps | Yellow |
| 25 amps | Transparent |
| 30 amps | Turquoise |
| 40 amps | Orange |
| 50 amps | Red |
| 60 amps | Blue |
| 70 amps | Light brown |
| 80 amps | White |
| 100 amps | Violet |
Diagnostics
Thread overview
After removing the fuse from the socket, inspect it.
- If the wire (1) is not damaged, as on the fuse on the left, check it with a multimeter or test light as described below.
- If the wire (2) is broken, as on the fuse on the right, check if it could have caused a short circuit on the corresponding line, correct the problem, and then replace the fuse.
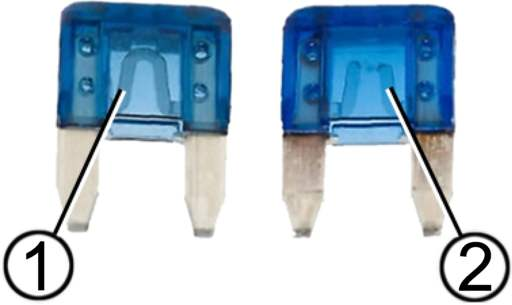
Renault Trucks T fuse check
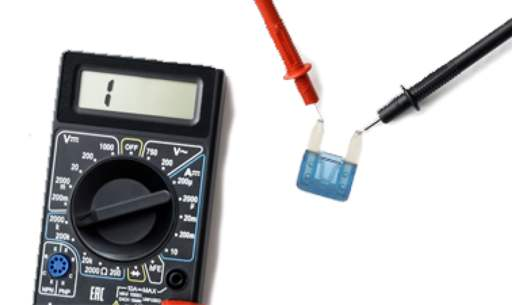
If the fuse looks good, check it with a multimeter as an ohmmeter or a test light.
- If the fuse resistance is close to 0 or the indicator light is on, the fuse is OK.
- If not, check if a short circuit on the relevant line could have caused it, eliminate the problem, and then replace the fuse.
If you do not find any faulty fuses after checking, your car may have gone into safe mode.
Make sure there is no short circuit in the car.
Turn off the car and turn off the main switch. When you turn it back on, the electronic units will reboot.
If the problem persists, contact a Renault Trucks dealer.